Overview
Infographic
Slides and video
Through this presentation, these slides, and this video, you’ll get familiar with the key contents of this unit.
Introduction
Everything in CSS has a box around it, and understanding these boxes is key to being able to create layouts with CSS, or to align items with other items. In this lesson, we will take a proper look at the CSS Box Model so that you can build more complex layout tasks with an understanding of how it works and the terminology that relates to it.
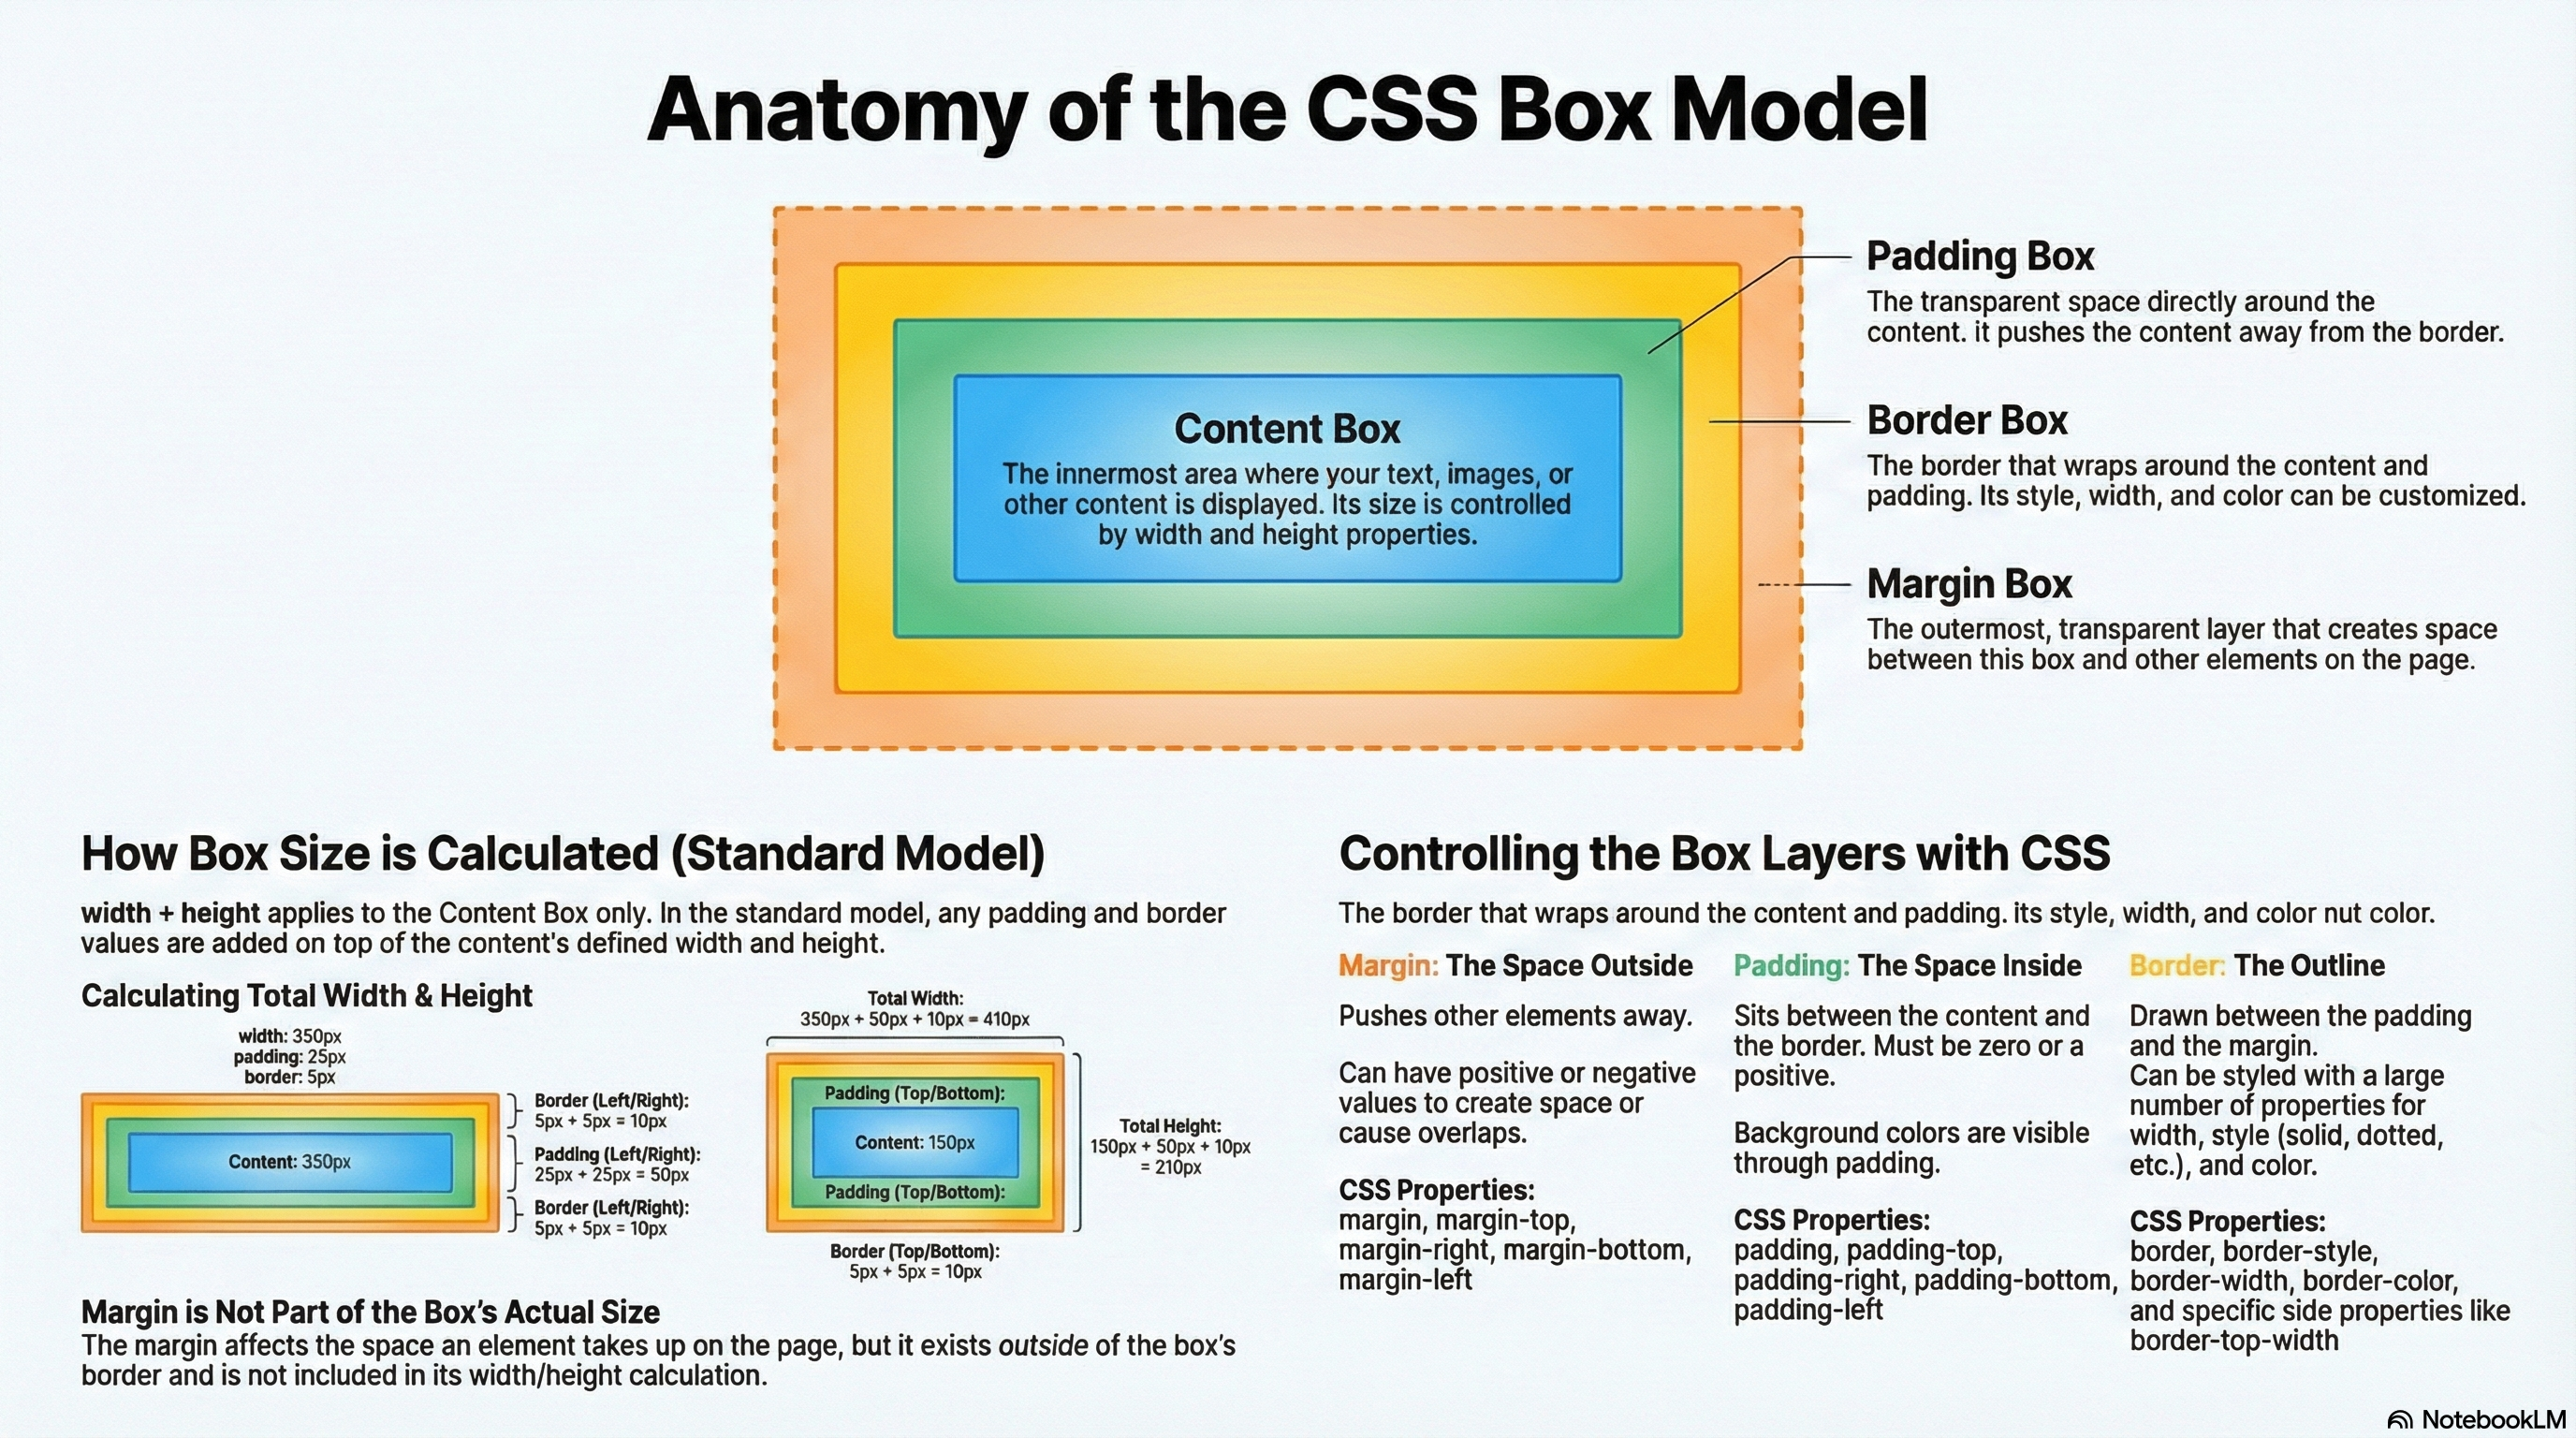
What is the CSS box model?
The full CSS box model applies to block boxes. This model defines how the different parts of a box (margin, border, padding, and content) work together to create a box that you can see on the page.
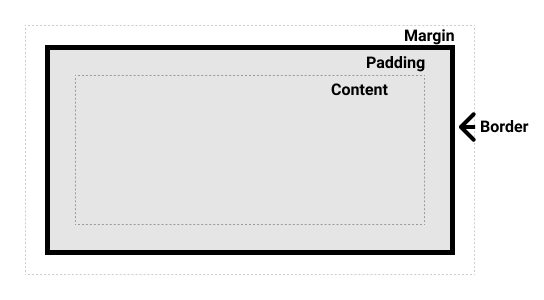
Parts of a box
When making up a block box in CSS we will have to keep in mind the following parts:
- Content box: The area where your content is displayed, which can be sized using properties like width and height.
- Padding box: The padding sits around the content as white space; its size can be controlled using padding and related properties.
- Border box: The border box wraps the content and any padding. Its size and style can be controlled using border and related properties.
- Margin box: The margin is the outermost layer, wrapping the content, padding and border as whitespace between this box and other elements. Its size can be controlled using margin and related properties.
The below diagram shows these layers:
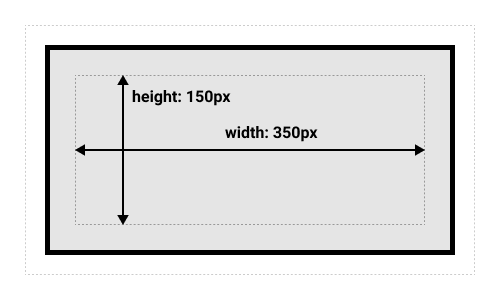
In the standard box model, if you give a box a width and a height attribute, this defines the width and height of the content box. Any padding and border is then added to that width and height to get the total size taken up by the box. This is shown in the image below.
If we assume that the box has the following CSS defining width, height, margin, border, and padding:
.box {
  width: 350px;
  height: 150px;
  margin: 10px;
  padding: 25px;
  border: 5px solid black;
}
The space taken up by our box using the standard box model will actually be 410px (350 + 25 + 25 + 5 + 5), and the height 210px (150 + 25 + 25 + 5 + 5), as the padding and border are added to the width used for the content box:
The margin is not counted towards the actual size of the box. Sure, it affects the total space that the box will take up on the page, but only the space outside the box. The box’s area stops at the border (it does not extend into the margin).
Proposed exercise: Playing with box models
In the below example, you can see a couple of boxes with a CSS class which gives some values to
You can have a look at the different colors here: https://developer.mozilla.org/en-US/docs/Web/CSS/color_value.width,height,margin,border, andpadding. Using that code, create a web page with five different boxes, each one with different styles. You have to change also the color of the text (you can choose the colors your like). And finally add some shadows to the text using different styles and colors.
CSS code:
.box1 {
  border: 5px solid red;
  background-color: lightgray;
  padding: 10px;
  margin: 25px;
  width: 250px;
  height: 200px;
  ...
}

.box2 {
  border: 7px solid green;
  background-color: gray;
  padding: 5px;
  margin: 0px;
  width: 300px;
  height: 200px;
  color: white;
  ...
}

...
HTML code:
<div class="box1">This is a 250x200px box with a 5px red border, and lightgray background, 10px padding and 25px margin.</div>
<div class="box2">This is a 300x200px box with a 7px green border, gray background, white text color, 5px padding and 0px margin.</div>
...
And the result:
Margins, padding and borders
You’ve already seen the margin, padding, and border properties at work in the example above. The properties used in that example are shorthands and allow us to set all four sides of the box at once. These shorthands also have equivalent longhand properties, which allow control over the different sides of the box individually.
Let’s explore these properties in more detail.
Margin
The margin is an invisible space around your box. It pushes other elements away from the box. Margins can have positive or negative values. Setting a negative margin on one side of your box can cause it to overlap other things on the page.
We can control all margins of an element at once using the margin property, or each side individually using the equivalent longhand properties:
Proposed exercise: Custom margins
Create a web page with the example below, and change the margin values to see how the boxes are pushed around due to the margin creating or removing space (if it is a negative margin) between this element and the containing element. Finally, add three more boxes with any style you like inside the same container.
.container {
  border: 5px solid red;
}

.box1 {
  border: 5px solid green;
  margin-top: 10px;
  margin-left: 10px;
  width: 50%;
}

.box2 {
  border: 5px solid blue;
  margin-top: 10px;
  margin-left: 50px;
  width: 50%;
}

.box3 {
  border: 5px solid orange;
  margin-top: 10px;
  margin-left: 100px;
  width: 50%;
}
...
<div class="container">
  <div class="box1">This is a box with 50% width and 10px from top and left inside a container</div>
  <div class="box2">This is a box with 50% width and 10px from top and 50px left inside a container</div>
  <div class="box3">This is a box with 50% width and 10px from top and 100px left inside a container</div>
  ...
</div>
Padding
The padding sits between the border and the content area. Unlike margins you cannot have negative amounts of padding, so the value must be 0 or a positive value. Any background applied to your element will display behind the padding, and it is typically used to push the content away from the border.
We can control the padding on each side of an element individually using the padding property, or each side individually using the equivalent longhand properties:
Proposed exercise: Custom padding
If you change the values for padding on the classes
.boxin the example below you can see that this changes where the text begins in relation to the box. Padding can be changed on any element, and will make space between its border and whatever is inside the element. Create a web page with the code below and add three more boxes using different paddings and styles.
.box1 {
  border: 5px solid red;
  margin: 10px;
  ...
}

.box2 {
  border: 5px solid blue;
  margin: 10px;
  padding: 25px;
  ...
}

.box3 {
  border: 5px solid green;
  margin: 10px;
  padding: 50px;
  ...
}
...
<div class="box1">
  This is a box without padding
</div>
<div class="box2">
  This is a box with 25 px padding
</div>
<div class="box3">
  This is a box with 50px padding
</div>
...
Borders
The border is drawn between the margin and the padding of a box. If you are using the standard box model, the size of the border is added to the width and height of the box.
For styling borders, there are a large number of properties (there are four borders, and each border has a style, width and color that we might want to manipulate).
You can set the width, style, or color of all four borders at once using the border property.
To set the properties of each side individually, you can use:
To set the width, style, or color of all sides, use the following:
To set the width, style, or color of a single side, you can use one of the most granular longhand properties:
- border-top-width
- border-top-style
- border-top-color
- border-right-width
- border-right-style
- border-right-color
- border-bottom-width
- border-bottom-style
- border-bottom-color
- border-left-width
- border-left-style
- border-left-color
Proposed exercise: Custom borders
In the example below we have used various shorthands and longhands to style the borders. Create a new web page with that code and have a play around with the different properties to check that you understand how they work. Finally add three more boxes and set the border styles as you like.
You can have a look at the MDN pages (linked above) to get information about the different styles of border you can choose from. Also you can have a look at the different colors here: https://developer.mozilla.org/en-US/docs/Web/CSS/color_value.
.box1 {
  border-top: 5px dotted green;
  border-right: 5px dashed orange;
  border-bottom: 5px dotted red;
  border-left: 5px dashed blue;
  padding: 15px;
  margin-top: 15px;
  margin-bottom: 15px;
  text-align: center;
  ...
}

.box2 {
  border: 5px solid black;
  border-left-width: 10px;
  border-right-width: 10px;
  border-top-color: aqua;
  border-bottom-color: pink;
  padding: 15px;
  text-align: center;
  ...
}

.box3 {
  border: 2px solid black;
  padding: 10px;
  ...
}

...
<div class="box1">This is a box with different types of borders</div>
<div class="box2">This is another box with different types of borders</div>
<div class="box1">
  <div class="box2">This is a box with different types of borders inside another box</div>
</div>
<div class="box3">
  <div class="box3">
    <div class="box3">
      <div class="box3">
        <div class="box3">
          <div class="box3">
            These are boxes inside boxes
          </div>
        </div>
      </div>
    </div>
  </div>
</div>
...
Quiz
Test your skills with this quiz about the box model.