Introduction
In this unit we are going to use Phaser together with a tilemap editor to build our world. You may find more information at the official page of the Tiled editor and you may also have a look at some interesting demonstrations at the Phaser’s examples page, and also performing some search on the latest examples.
HTML and CSS code
The first thing we should do is linking the Phaser library. We will use the last version at the time this unit has been written:
<script src="https://cdn.jsdelivr.net/npm/[email protected]/dist/phaser.min.js"></script>
After that we are going to insert some CSS code to remove any margin and padding, and also to remove the scrollbars, so that all the window size is used when the game is started:
html, body {
    margin: 0px;
    padding: 0px;
    overflow: hidden;
    height: 100%;
}
And finally we are going to use a single file to put all the code inside. This is going to be the basic structure of the “.html” file:
<!doctype html>
<html lang="en">
<head>
    <meta charset="UTF-8" />
    <title>First game with Phaser 3</title>
    <script src="https://cdn.jsdelivr.net/npm/[email protected]/dist/phaser.min.js"></script>
    <style type="text/css">
        html, body {
            margin: 0px;
            padding: 0px;
            overflow: hidden;
            height: 100%;
        }
    </style>
</head>
<body>
    <script type="text/javascript">
        ...
    </script>
</body>
</html>
Constants
We are going to define some constants at the beginning of the code so that we can easily change the game appearance, difficulty, and some other parameters:
const screenWidth = window.innerWidth;
const screenHeight = window.innerHeight;
const numCoins = 15;
const numHealth = 5;
const numPower = 5;
const numZombies = 10;
Phaser configuration and other variables
Following the constants we are going to create some variables so keep all the information about the game and also to start the initialization of Phaser:
const config = {
    type: Phaser.AUTO,
    width: screenWidth,
    height: screenHeight,
    physics: {
        default: "arcade",
        arcade: {
            debug: false,
            gravity: { y: 0 }
        }
    },
    scene: {
        preload: preload,
        create: create,
        update: update
    }
};

const game = new Phaser.Game(config);
let worldWidth, worldHeight, joystickSize = 40, scale = 1.75, speed = 175;
let belowLayer, worldLayer, aboveLayer, tileset, emptyTiles;
let map, player, cursors, bell, bell2, dead, timeout;
let joyStick = joyStick2 = { up: false, down: false, left: false, right: false };
let score = 0, lives = 5, scoreText = null, gameOver = false;
The assets (images, sprites and sounds)
We will need some images, sprites and sounds. You may use any assets you like, but we are also providing some examples so that you can easily start testing (they can also be downloaded here):
Images

Sprites (player and animated objects)


Sounds and music
Loading all the assets
So that we can use all those images, sprites and music, they have to be loaded previously. That is the purpose of the “preload()” function. We will also include here the initialization of the joystick so that we can use it in another section of this unit.
Proposed exercise: Game initialization
Create a specific folder for your game in your domain to put all the code and assets inside. After that, create an “index.html” inside that folder with the code below, and also create an “assets” folder to put all the images and sounds, which can be downloaded here. After uploading everything to your domain, test the game using the url of that folder in your browser, and you should get a full black screen. Click on it and the background music should start playing.
You can see the result here (you can also look at the source code by pressing Ctrl+U).
<!doctype html>
<html lang="en">
<head>
<meta charset="UTF-8" />
<title>First game with Phaser 3</title>
<script src="https://cdn.jsdelivr.net/npm/[email protected]/dist/phaser.min.js"></script>
<style type="text/css">
html,
body {
margin: 0px;
padding: 0px;
overflow: hidden;
height: 100%;
}
</style>
</head>
<body>
<div id="game-container"></div>
<script type="text/javascript">
const screenWidth = window.innerWidth;
const screenHeight = window.innerHeight;
const numCoins = 15;
const numHealth = 5;
const numPower = 5;
const numZombies = 10;
const config = {
type: Phaser.AUTO,
width: screenWidth,
height: screenHeight,
physics: {
default: "arcade",
arcade: {
debug: false,
gravity: { y: 0 }
}
},
scene: {
preload: preload,
create: create,
update: update
}
};
const game = new Phaser.Game(config);
let worldWidth, worldHeight, joystickSize = 40, scale = 1.75, speed = 175;
let belowLayer, worldLayer, aboveLayer, tileset, emptyTiles;
let map, player, cursors, bell, bell2, dead, timeout;
let joyStick = joyStick2 = { up: false, down: false, left: false, right: false };
let score = 0, lives = 5, scoreText = null, gameOver = false;
function preload() {
this.load.image("restart", "assets/restart.png");
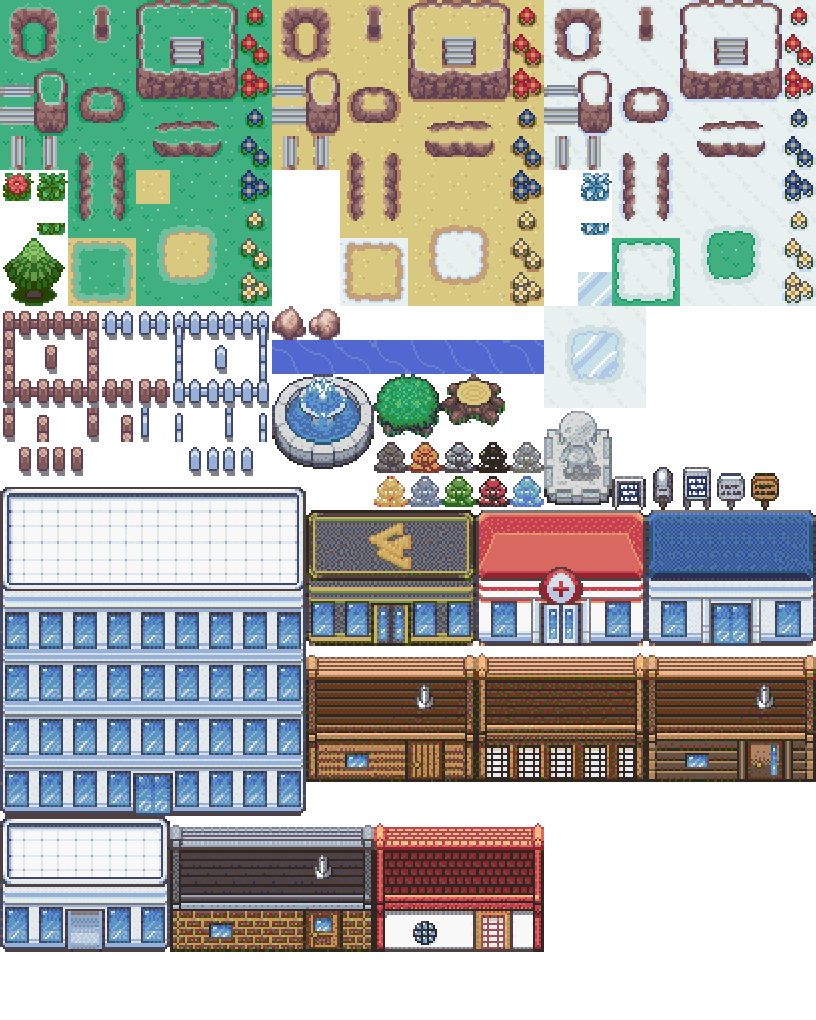
this.load.image("tiles", "assets/tileset.png");
this.load.tilemapTiledJSON("map", "assets/town.json");
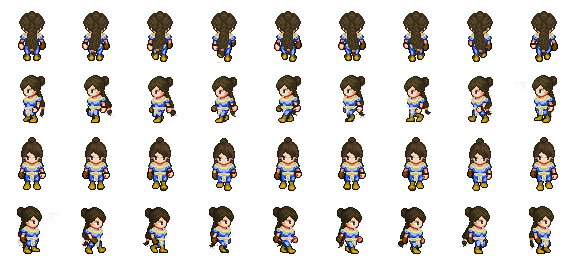
this.load.spritesheet("player", "assets/lidia.png", { frameWidth: 64, frameHeight: 64 });
this.load.spritesheet("coin", "assets/coin.png", { frameWidth: 32, frameHeight: 32 });
this.load.spritesheet("health", "assets/health.png", { frameWidth: 32, frameHeight: 32 });
this.load.spritesheet("power", "assets/power.png", { frameWidth: 64, frameHeight: 64 });
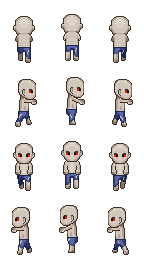
this.load.spritesheet("zombie", "assets/zombie.png", { frameWidth: 48, frameHeight: 64 });
this.load.audio("bell", "assets/ding.mp3");
this.load.audio("bell2", "assets/ding2.mp3");
this.load.audio("dead", "assets/dead.mp3");
this.load.audio("music", "assets/music.mp3");
this.load.plugin('rexvirtualjoystickplugin', 'https://cdn.jsdelivr.net/npm/[email protected]/dist/rexvirtualjoystickplugin.min.js', true);
}
function initSounds() {
bell = this.sound.add('bell', { volume: 0.2 });
bell2 = this.sound.add('bell2', { volume: 0.2 });
dead = this.sound.add('dead', { volume: 0.7 });
this.sound.add('music', { volume: 0.4 }).play({ loop: -1 });
}
function create() {
initSounds.call(this);
}
function update(time, delta) {
}
</script>
</body>
</html>
Proposed exercise: Using your own music
Download any other music file you like to use it as a background music and change the JavaScript code inside the “preload()” function to set the file name accordingly. Also in the “initSounds()” function you will find that you may change the volume of the music (volume:0.4). Try changing that value from 0.1 to 1 and you will notice that the volume of the music will also change.
You may find in the following sites some free images and sounds which you can download and use for your own game:
- OpenGameArt.
- Itch.io.
- GameDev Market and Free character assets.
- Reddit /r/GameAssets.
- Game Art 2D.
- CraftPix.
The map
Once we have initialized Phaser and after loading all the assets, we can go ahead and display the map on the screen.
Proposed exercise: Displaying the map
Add the function “createWorld()” (provided below) to your code, and modify the calling function “create()” so that it is called when the game is started (also shown below). Finally test everything in your browser from your domain.
About the music, do not forget to click on the screen after loading the game (the music will not start playing unless the browser gets the focus). Also, you can see the result here (you can look at the source code by pressing Ctrl+U).
- This is the new function you have to insert in your code to create the world:
function createWorld() {
    map = this.make.tilemap({ key: "map" });

    scale *= Math.max(screenWidth/map.widthInPixels, screenHeight/map.heightInPixels);

    worldWidth = map.widthInPixels * scale;
    worldHeight = map.heightInPixels * scale;
    speed *= scale;
    joystickSize *= scale;

    // Parameters are the name you gave the tileset in Tiled and then the key of the tileset image in
    // Phaser's cache (i.e. the name you used in preload)
    tileset = map.addTilesetImage("tileset", "tiles");

    // Parameters: layer name (or index) from Tiled, tileset, x, y
    belowLayer = map.createLayer("Below Player", tileset, 0, 0).setScale(scale).setDepth(1);
    worldLayer = map.createLayer("World", tileset, 0, 0).setScale(scale).setDepth(2);
    aboveLayer = map.createLayer("Above Player", tileset, 0, 0).setScale(scale).setDepth(3);

    worldLayer.setCollisionByProperty({ collides: true });

    // Find empty tiles where new zombies, coins or health can be created
    emptyTiles = worldLayer.filterTiles(tile => (tile.index === -1 || !tile.collides));
}
- Do not forget to update the “create()” function to create the world. This is the only line you should add to that function:
function create() {
    ...
    createWorld.call(this);
}
Proposed exercise: Scaling the map
Change the value of the “scale” variable (at the top of your code) and refresh the map in your browser to check that it is scaled accordingly. You can set values such as “scale = 0.5” and you will notice that the map just fits half the screen. Set also higher values and check the results again.
The animations (sprites)
We will use sprites to create the player and the animated objects. For example, let’s have a look at the player:
We may appreciate that we have 36 pictures divided into 4 different groups. This way, we may easily create all four animations:
- Up: Pictures from 0 to 8
- Left: Pictures from 9 to 17
- Down: Pictures from 18 to 26
- Right: Pictures from 27 to 35
Controlling the player’s animations
So that this game can be used in both desktop and mobile devices, we have to initialize both the cursor keys and the joystick. Once this is done, we must change the player’s velocity and the current animation when the user presses the keys or moves the joystick. In the next exercise we will first define the animations inside the “createAnimations()” function, and after that we will go ahead with the “createPlayer()” function, where we will display the player. We will finally include in the “update()” function some conditions to adjust the player’s speed and current animation.
Proposed exercise: Adding the player
Add the code below to your game and check both the player animations and movements. After that, look for another sprite and change the code accordingly to use your own sprite. Finally, change the values of the constant “speed” (at the top of your code) and check the results. You will also notice that the camera will follow you on each player’s movement.
You can see the result here (you can look at the source code by pressing Ctrl+U). Also, as listed above, you may find many free assets in OpenGameArt and choose other sprites you like.
- These are the new functions you have to insert in your code to create the animations and initialize everything related to the player:
function createAnimations() {
    const anims = this.anims;
    // Player
    anims.create({
        key: "left", frameRate: 10, repeat: -1,
        frames: this.anims.generateFrameNumbers('player', { start: 9, end: 17 }),
    });
    anims.create({
        key: "right", frameRate: 10, repeat: -1,
        frames: this.anims.generateFrameNumbers('player', { start: 27, end: 35 }),
    });
    anims.create({
        key: "up", frameRate: 10, repeat: -1,
        frames: this.anims.generateFrameNumbers('player', { start: 0, end: 8 }),
    });
    anims.create({
        key: "down", frameRate: 10, repeat: -1,
        frames: this.anims.generateFrameNumbers('player', { start: 18, end: 26 }),
    });
    anims.create({
        key: "waiting", frameRate: 3, repeat: -1,
        frames: this.anims.generateFrameNumbers('player', { start: 19, end: 21 }),
    });
    // Coin
    anims.create({
        key: "flying", frameRate: 10, repeat: -1,
        frames: this.anims.generateFrameNumbers('coin', { start: 0, end: 7 }),
    });
    // Health
    anims.create({
        key: "floating", frameRate: 5, repeat: -1,
        frames: this.anims.generateFrameNumbers('health', { start: 0, end: 3 }),
    });
    // Power
    anims.create({
        key: "growing", frameRate: 5, repeat: -1,
        frames: this.anims.generateFrameNumbers('power', { start: 0, end: 3 }),
    });
    // Zombie
    anims.create({
        key: "moving", frameRate: 5, repeat: -1,
        frames: this.anims.generateFrameNumbers('zombie', { start: 0, end: 11 }),
    });
}

function createPlayer() {
    // Object layers in Tiled let you embed extra info into a map - like a spawn point or custom
    // collision shapes. In the tmx file, there's an object layer with a point named "Spawn Point"
    const spawnPoint = map.findObject("Objects", obj => obj.name === "Spawn Point");

    // Create a sprite with physics enabled via the physics system. The image used for the sprite has
    // a bit of whitespace, so I'm using setSize & setOffset to control the size of the player's body
    player = this.physics.add
        .sprite(spawnPoint.x * scale, spawnPoint.y * scale, "player")
        .setSize(16, 32).setOffset(24, 32).setScale(scale)
        .setCollideWorldBounds(true).setDepth(2);

    // Watch the player and worldLayer for collisions, for the duration of the scene
    this.physics.add.collider(player, worldLayer);

    const camera = this.cameras.main;
    const world = this.physics.world;
    camera.startFollow(player);
    camera.setBounds(0, 0, worldWidth, worldHeight);
    world.setBounds(0, 0, worldWidth, worldHeight);

    cursors = this.input.keyboard.createCursorKeys();

    // Do not show the joysticks on desktop devices
    if (!this.sys.game.device.os.desktop) {
        joyStick = this.plugins.get('rexvirtualjoystickplugin').add(this, {
            x: screenWidth - joystickSize * 2,
            y: screenHeight - joystickSize * 2,
            radius: joystickSize,
            base: this.add.circle(0, 0, joystickSize, 0x888888).setAlpha(0.5).setDepth(4),
            thumb: this.add.circle(0, 0, joystickSize, 0xcccccc).setAlpha(0.5).setDepth(4)
        }).on('update', update, this);

        joyStick2 = this.plugins.get('rexvirtualjoystickplugin').add(this, {
            x: joystickSize * 2,
            y: screenHeight - joystickSize * 2,
            radius: joystickSize,
            base: this.add.circle(0, 0, joystickSize, 0x888888).setAlpha(0.5).setDepth(4),
            thumb: this.add.circle(0, 0, joystickSize, 0xcccccc).setAlpha(0.5).setDepth(4)
        }).on('update', update, this);
    }
}
- Also you have to insert some code inside the “update()” function to respond to the cursor keys and the joystick:
function update(time, delta) {
    if (gameOver) return;

    let vX = 0, vY = 0;

    // Horizontal movement
    if (cursors.left.isDown || joyStick.left || joyStick2.left) vX = -speed;
    else if (cursors.right.isDown || joyStick.right || joyStick2.right) vX = speed;

    // Vertical movement
    if (cursors.up.isDown || joyStick.up || joyStick2.up) vY = -speed;
    else if (cursors.down.isDown || joyStick.down || joyStick2.down) vY = speed;

    // Set and normalize the velocity so that player can't move faster along a diagonal
    player.setVelocity(vX, vY).body.velocity.normalize().scale(speed);

    // Choose the right player's animation
    if (vX < 0) player.anims.play('left', true);
    else if (vX > 0) player.anims.play('right', true);
    else if (vY < 0) player.anims.play('up', true);
    else if (vY > 0) player.anims.play('down', true);
    else player.anims.play('waiting', true);
}
- And finally do not forget to update the “create()” function to create the animations and the player. You just have to insert a couple of new lines:
function create() {
    ...
    createAnimations.call(this);
    createPlayer.call(this);
}
Proposed exercises: Modifying the map
Download the tile map editor from this link and install it on your computer. Go to the assets folder and open the file “town.tmx” which contains the map of the example explained in this unit. Select the layer “World” (on the right corner, at the top) and change anything you like (by adding or removing some objects to or from the map). When you finish, export the map to JSON format using the option “File” -> “Export as…”, and overwrite the file “town.json”, located inside the “assets” folder. Finally check the results using your browser and move the player to go to each part of the map. You will notice again that the camera will follow you on each movement.
Do not forget to fully refresh the contents of the browser by pressing Ctrl+F5, since the map and some other contents are usually cached by the browser. Also move the player and check that the map has been updated with the changes you have made.
Score, coins, power, health, and enemies
We will create many different objects at once using the same images. We will just change the size of the objects by scaling them, and we will use a loop to print as many objects as we like.
Proposed exercise: Adding the score
Using the global variables, we may easily show both the score and number of remaining lives. Add the code below to your game and check the results. After that, change the value of the variable “lives” (at the top of your code) to check how easily you can customize that text.
You can see the result here (you can look at the source code by pressing Ctrl+U).
function showScore() {
    if (!scoreText) {
        scoreText = this.add.text(screenWidth/2, 16, '', { fontSize: (32 * scale) + 'px', fill: '#FFF' });
        scoreText.setShadow(3, 3, 'rgba(0,0,0,1)', 3).setOrigin(0.5, 0).setScrollFactor(0).setDepth(4);
    }
    scoreText.setText('Score:' + score + ' / Lives:' + lives);
}
function create() {
    ...
    showScore.call(this);
}
Proposed exercises: Adding the coins
Add the code below to your file and check the results. After that, change the value of the constant “numCoins” (at the top of your code) to check how easily you can customize your game. Refresh the page several times and you will notice that the generated coins have random sizes and they appear at random positions. Finally, look for another sprite sheet (it may be a coin or any other object you like) and change the code accordingly to use your own animated object.
You can see the result here (you can look at the source code by pressing Ctrl+U). Also, as listed above, you may find many free assets in OpenGameArt and choose the images you like.
function newObject(type, animation, context) {
    let tile = Phaser.Utils.Array.GetRandom(emptyTiles);
    return context.physics.add.sprite(tile.pixelX * scale, tile.pixelY * scale, type).anims.play(animation, true).setDepth(2);
}

function createCoin() {
    const v = Phaser.Math.Between(speed / 10, speed / 5);
    let coin = newObject('coin', 'flying', this).setSize(16, 32).setScale(1.5 * scale).setBounce(1).setVelocity(v, 0);
    coin.body.setAllowGravity(false).setCollideWorldBounds(true);
    this.physics.add.collider(coin, worldLayer);
    this.physics.add.overlap(player, coin, collectCoin, null, this);
}

function collectCoin(player, coin) {
    bell.play();
    coin.destroy();
    createCoin.call(this);

    score += 10;
    showScore();
}
function create() {
    ...
    for (i = 0; i < numCoins; i++) setTimeout(() => createCoin.call(this), Phaser.Math.Between(0, 5000));
}
Proposed exercises: Adding the health
Add the code below to your game and check the results. After that, change the value of the constants “numHealth” (at the top of your code) to check how easily you can customize your game. Finally, look for another sprite and change the code accordingly to use your own object to provide the player with extra lives.
You may click here to see how the game looks like. As listed above, you may find many free assets in OpenGameArt.
function createHealth() {
    let health = newObject('health', 'floating', this).setSize(16, 32).setScale(1.2 * scale);
    health.body.setAllowGravity(false);
    this.physics.add.overlap(player, health, collectHealth, null, this);
}

function collectHealth(player, health) {
    bell2.play();
    health.destroy();
    createHealth.call(this);

    lives++;
    showScore();
}
function create() {
    ...
    for (i = 0; i < numHealth; i++) setTimeout(() => createHealth.call(this), Phaser.Math.Between(0, 5000));
}
Proposed exercises: Adding the power
Add the code below to your game and check the results. After that, change the value of the constants “numPower” (at the top of your code) to check how easily you can customize your game. Finally, look for another sprite and change the code accordingly to use your own power object.
You may click here to see how the game looks like. As listed above, you may find many free assets in OpenGameArt.
function createPower() {
    let power = newObject('power', 'growing', this).setSize(32, 64).setScale(scale/2);
    power.body.setAllowGravity(false);
    this.physics.add.overlap(player, power, collectPower, null, this);
}

function protect(color) {
    player.setTint(color);
    if (timeout) clearTimeout(timeout);
    timeout = setTimeout(() => { timeout = false; player.clearTint() }, 5000);
}

function collectPower(player, power) {
    bell2.play();
    power.destroy();
    createPower.call(this);

    protect(0xFFFF00);
}
function create() {
    ...
    for (i = 0; i < numPower; i++) setTimeout(() => createPower.call(this), Phaser.Math.Between(0, 5000));
}
Proposed exercises: Adding the enemies
Add the code below to your game and check the results. After that, change the value of the constants “numZombies” (at the top of your code) to check how easily you can customize your game. Finally, look for another sprite and change the code accordingly to display your own enemies.
You may click here to see how the game looks like. As listed above, you may find many free assets in OpenGameArt.
function createZombie() {
    const v = Phaser.Math.Between(-speed / 4, -speed / 3);
    let zombie = newObject('zombie', 'moving', this).setSize(16, 32).setOffset(16, 32).setScale(1.2 * scale).setBounce(1).setVelocity(0, v);
    zombie.body.setAllowGravity(false).setCollideWorldBounds(true);
    this.physics.add.collider(zombie, worldLayer);
    this.physics.add.overlap(player, zombie, hitZombie, null, this);
}

function hitZombie(player, zombie) {
    // If the player is already hurt, it cannot be hurt again for a while
    if (player.tintTopLeft == 0xFF0000) return;

    if (timeout) {
        score += 15;
        showScore();
    }
    else {
        protect(0xFF0000);
        lives--;
    }

    dead.play();
    showScore();

    if (lives == 0) {
        this.physics.pause();
        gameOver = true;
        this.add.image(screenWidth / 2, screenHeight / 2, 'restart')
            .setScale(4).setScrollFactor(0).setDepth(4)
            .setInteractive().on('pointerdown', () => location.reload());
    }
    else {
        zombie.destroy();
        createZombie.call(this);
    }
}
function create() {
    ...
    for (i = 0; i < numZombies; i++) setTimeout(() => createZombie.call(this), Phaser.Math.Between(0, 5000));
}
Enjoy the game!
You may enjoy playing this wonderful game online here.